Financial literacy, coding and the Makey Makey (optional)
By: Lisa Anne Floyd
The types of coding activities that we find to be most valuable are the ones that incorporate a wide variety of concepts and skills.
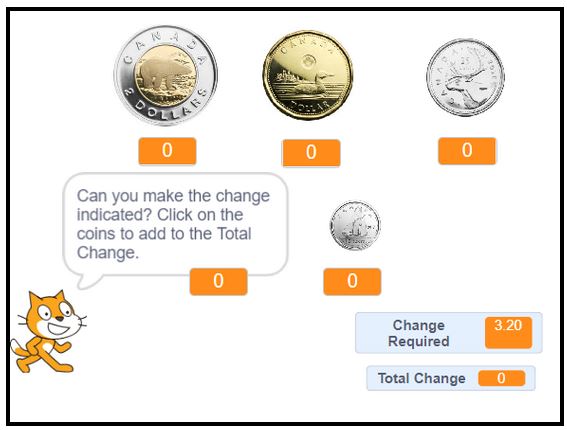
In this activity, students can program a financial literacy game in Scratch that may also be combined with the Makey Makey. The program will ask the “player” to indicate the coins required to make the right change as indicated.
Step 1: Programming the game
If your students are experienced programmers, then it might be interesting to challenge them to make the game themselves.
Instructions for this challenge could be worded as follows:
- Create a small game that generates a real number between $0.00 and $4.95 (rounded to the nearest 0 or 5).
- The user will be challenged to enter the number of toonies, loonies, quarters, dimes and nickels to make the change indicated. When the change is correct, the program will indicate that the change is correct and will loop again to generate a new amount. If the amount goes above the change indicated, the program will indicate that the change value is too high.
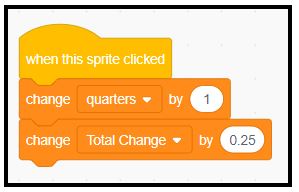
This coding challenge can be scaffolded by providing students with a skeleton of the program. For these applications, your students will need to click on each coin sprite and ensure the Total Change variable increases by the proper coin amount. For example, the quarter sprite code is shown below each option.
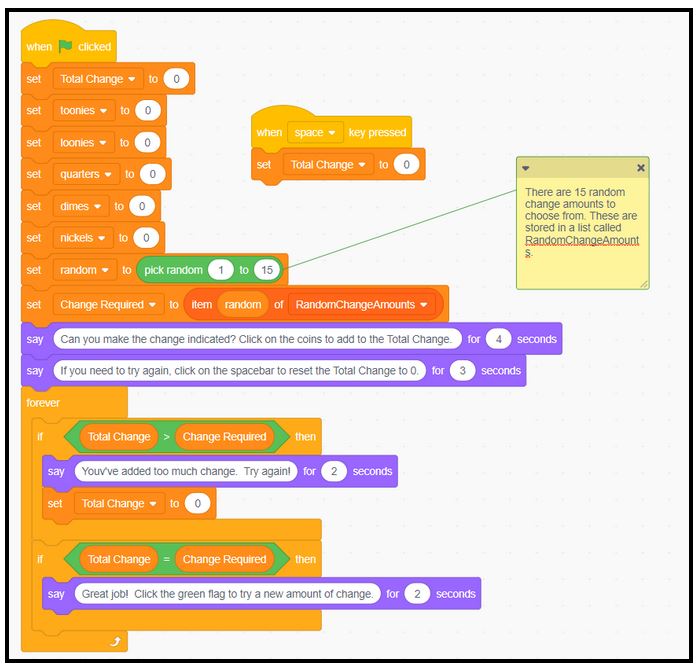
Skeleton of program – students complete the code for each coin sprite – this is a great exercise for reinforcing value amounts. You can see the code for the quarter – click on the quarter sprite to see this code. Students will need to add similar code for each of the other coin sprites.
Without Makey Makey option: click on the sprites within the Scratch program to add more coins to the Total Change.
With Makey Makey option: touch the coins attached to the Makey Makey to add more coins to the Total Change.
Completed Program: If your focus is on the hardware, electricity concepts and/or playing the game, you may opt to provide students with the completed program:
- without Makey Makey option
- with Makey Makey option
Step 2: Building the physical interface (if incorporating Makey Makey)
Materials needed will be a Makey Makey and required coins. Cardboard and glue or tape are optional.

Students will design and build the physical interface that will work with their code. Students enjoy the opportunity to be creative, so it’s sometimes wise to provide them with the suggested components of the physical interface, but allow them to decide how the components will be set-up based on the software (Scratch code).
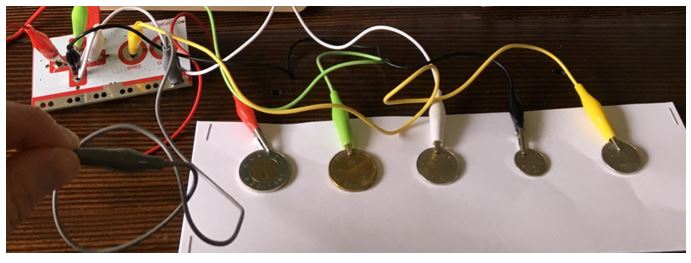
In this case, students will need to have five coins (toonie, loonie, quarter, dime, nickel) with the alligator clips attached to each one. One alligator clip will need to be held by the user as it will be the one attached to “Earth” or ground on the Makey Makey. The coins are made of metal, which is a conductor – great opportunity to discuss electricity concepts (grade 6 and 9 Ontario curriculum) – current, electron flow, insulators, conductors…
Alternatively, the coins may be placed on the cardboard holding the coins in place (using glue or tape). Each coin should connect, using a wire, to different parts of the Makey Makey including the left arrow, right arrow, up arrow, down arrow and Space bar. The students will also connect a wire to the ground and they can hold this wire, or attach it to a tinfoil wristband.
Students may take the time to create more professional looking interfaces that hide the alligator clips.
Step 3: Connecting the physical interface to the program (and altering the code slightly)
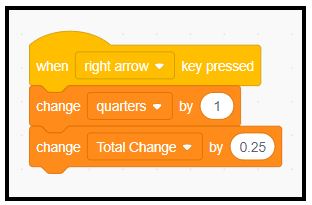
Students can now alter their code so rather than entering in the number of each coin needed by clicking on sprites, the program will tabulate coins by using the left arrow (toonies), right arrow (loonies), up arrow (quarters), down arrow (dimes) and space bar (nickels) – as in the code sample above for the application with the Makey Makey.
Students can plug in their Makey Makey to the computer and the code should work. If not, then students are presented with a wonderful opportunity to debug:
- Is the bug in the code?
- Is the bug in the hardware/wiring?
This is a great opportunity to investigate the problem solving strategies suggested by students. How do they determine where the bug is located? Can they perform some tests to rule out some of the possible bug locations?
In this activity, teachers can emphasize any number of aspects related to the lesson, including:
- The mathematics of making change;
- The use of manipulatives in mathematics learning;
- The mathematics of random numbers and rounding;
- Financial literacy skills related to the values of money pieces;
- Electricity concepts associated with the Makey Makey- current flow, insulators/conductors and open and closed circuits;
- The iterative problem solving and design process associated with building the circuits;
- Specific programming concepts including conditional (if) statements, loops and variables.
Some pedagogical components that we see as being valuable in this activity include:
- Opportunities for differentiation as students can program the code themselves, use the skeleton program, or use the completed program;
- If done in groups, students can assume different roles (computer engineer, electrical engineer, designer, etc.);
- This would qualify as a “low floor – high ceiling” activity as students can extend the activity to generate a price, a payment, and the user could calculate the change necessary;
- Students have an opportunity to be creative in how they design the “console” or input device (how they arrange the coins, etc.).
Let us know if you use and/or remix this activity! We would love to see how this activity could be improved.
Curriculum Expectations
Coding
This application incorporates curriculum expectations from the junior and intermediate grades. It connects especially well with grade 5 coding expectations:
C3. solve problems and create computational representations of mathematical situations using coding concepts and skills
- C3.1 solve problems and create computational representations of mathematical situations by writing and executing code, including code that involves conditional statements and other control structures
- C3.2 read and alter existing code, including code that involves conditional statements and other control structures, and describe how changes to the code affect the outcomes
Financial Literacy
This application incorporates curriculum expectations from both primary and junior grades, including grades 3 and 4:
F1. Grade 3: demonstrate an understanding of the value and use of Canadian currency
F1. Grade 4: demonstrate the knowledge and skills needed to make informed financial decisions
- F1.1 estimate and calculate the change required for various simple cash transactions involving whole-dollar amounts and amounts of less than one dollar
- F1.2 estimate and calculate the cost of transactions involving multiple items priced in whole-dollar amounts, not including sales tax, and the amount of change needed when payment is made in cash, using mental math
Science (Understanding Matter and Energy – Electricity and Electrical Devices)
Grade 6: investigate the characteristics of static and current electricity, and construct simple circuits.